
Long gone are the days when Facebook was a mere social platform.
Nowadays, it’s also one of the most powerful sales channels.
In 2023, even with social networks like TikTok rising in popularity among young people, Facebook is still the platform with the highest number of monthly active users.
3 billion, to be precise.
In the US, more than 70% of the population is on Facebook every day.
If you believe it’s ok to exclude it from your ecommerce marketing strategy, think again.
You should make it your priority to start advertising on Facebook and boost your ecommerce sales by taking advantage of this huge audience sitting right at your fingertips.
How?
With lots of patience.
Kidding. But not really.
The truth is, there’s no magic formula. But there are a few proven strategies you should absolutely try for your brand.
We’ll tackle everything step-by-step.
From setting up your Facebook Ads Manager to understanding which ad types to run for each stage of the sales funnel, and to creating stunning ad visuals in seconds.
But first…
Why are Facebook ads essential for ecommerce?
The 7–11–4 marketing rule tested by Google shows that on average, in order to convert, consumers need:
- 7 Hours of Interaction
- 11 Touchpoints
- 4 Separate Locations
So, 7 hours of your content, across 11 touchpoints, in 4 different locations.
In short, people need to see a lot of you before deciding to purchase.
They need to trust you. They need to eliminate all concerns regarding your products.
And more than anything, they need an emotional impulse.
That’s why it’s essential to complement all your other marketing efforts with Facebook ads.
Because even if you run a blog, send a bi-weekly newsletter, or maintain an active social media presence, you still need to be able to meet your potential customers right when they need that extra nudge to convince them to purchase.

From the awareness stage up until interest and consideration, it’s important to be in front of the right audiences with the right visuals and CTAs.
And you’ll see that configuring them in Facebook’s Ads Manager is not as hard as it seems.
The best part?
You don’t need to invest a lot of cash from the beginning. It’s perfectly fine to start with 5$/day and increase the amounts as your revenue grows.
The important thing is to make that 5$ work.
Let’s start with the basics.
1. Create a Meta Business Suite account
If you haven’t already, go to business.facebook.com and create a Meta Business Suite account.
From there, you’ll be able to manage both your Facebook and Instagram business profiles, schedule posts, view insights and of course, create ads.
Don’t forget to have both your Facebook and Instagram business profiles connected.
Because yes, some Facebook ads will also run on Instagram if you allow them to.
Now, you could start running ads directly from Meta Business Suite, by navigating to Your tools -> Ads from the right sidebar.
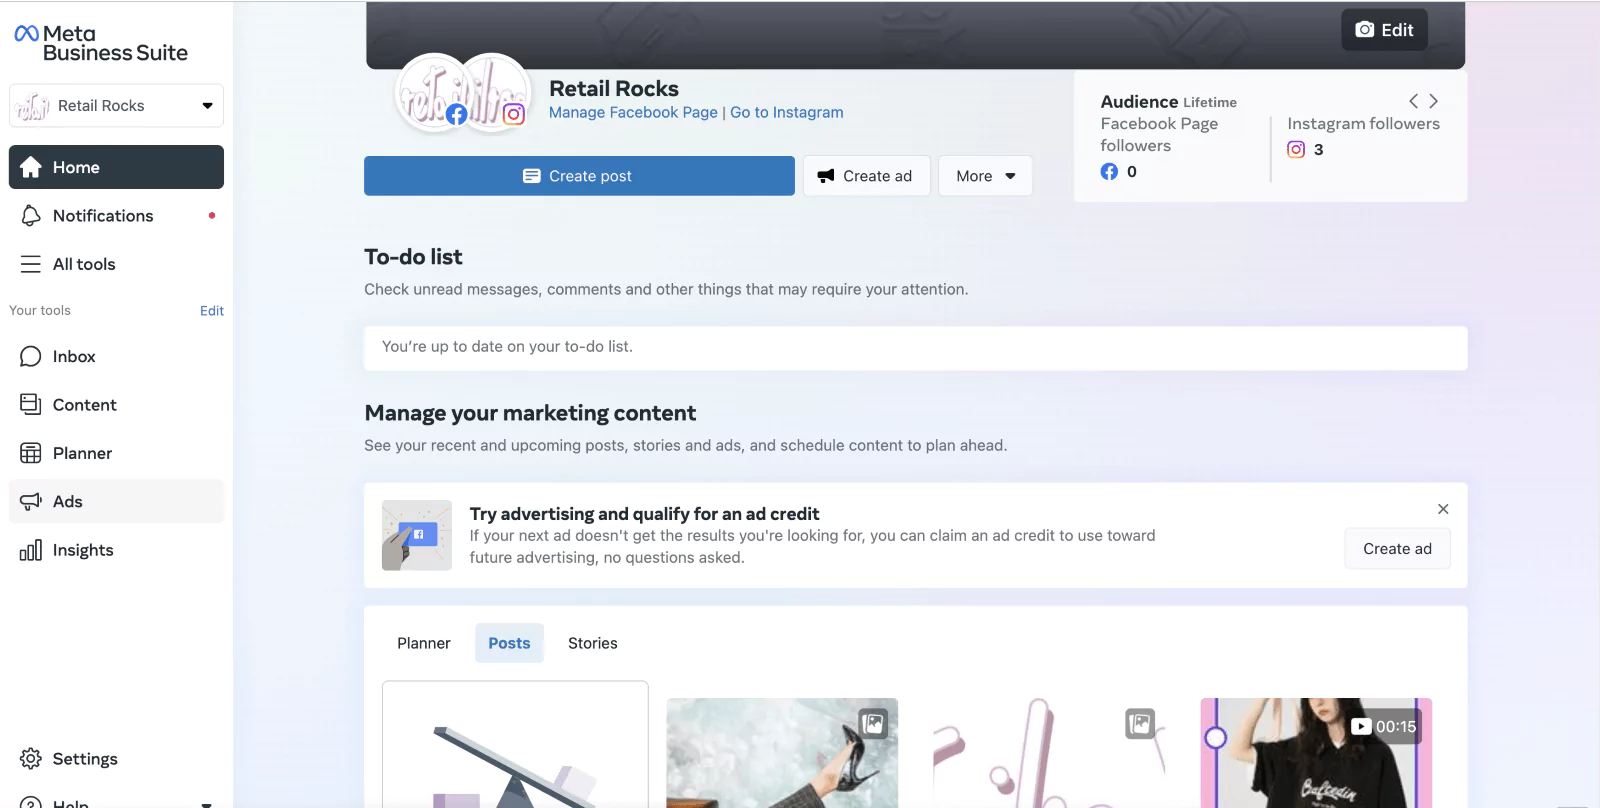
However, I don’t recommend going that way.
Meta Business Suite is great for other stuff, like managing your profile info and posts.
For ads, it has limited capabilities.
The real deal happens in Facebook’s Ads Manager.
The Ads Manager is still part of the Meta Business Suite, but has a separate interface dedicated strictly to ads.
You’ll have more options there for configuring your audiences and campaigns.
Go to Ads Manager and create a new ad account.
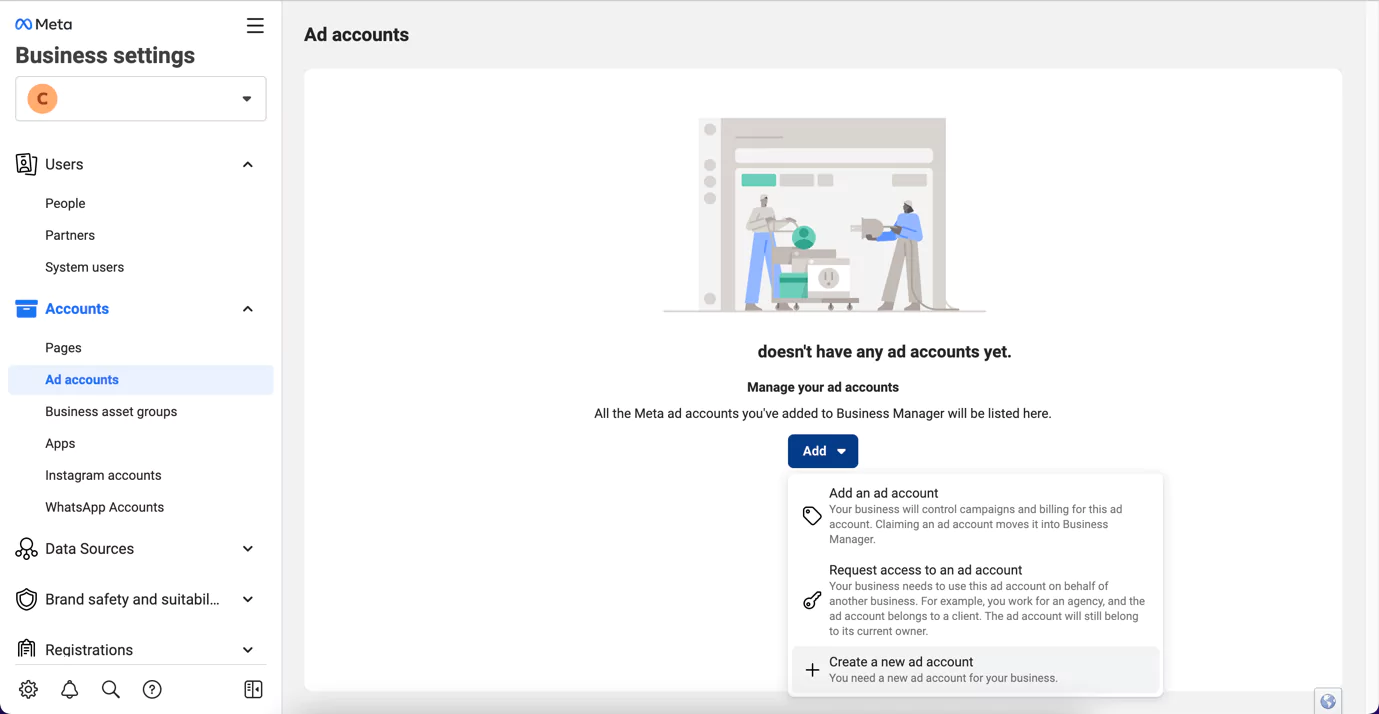
Finally, add a payment method.
And you’re set.
We’re almost done with technicalities, but there’s one more crucial step left.
2. Add the Meta Pixel to your website
The Meta Pixel is a small piece of HTML code you add to your website.
And then it tells you all kinds of interesting stuff.
Like who your audience is, how often they come to your site, what pages they visit, and how much time they’re spending there.
This is vital information to know if you want your ads to have any kind of effect.
And it must be installed a few weeks before running your first ad, as it needs time to gather data.
Hence the necessity of this step.
Once ready, you’ll use the data to create Custom Audiences and run the infamous, well-converting Retargeting Campaigns.
All of which we’ll go through in detail shortly.
First, let’s get that Meta Pixel installed.
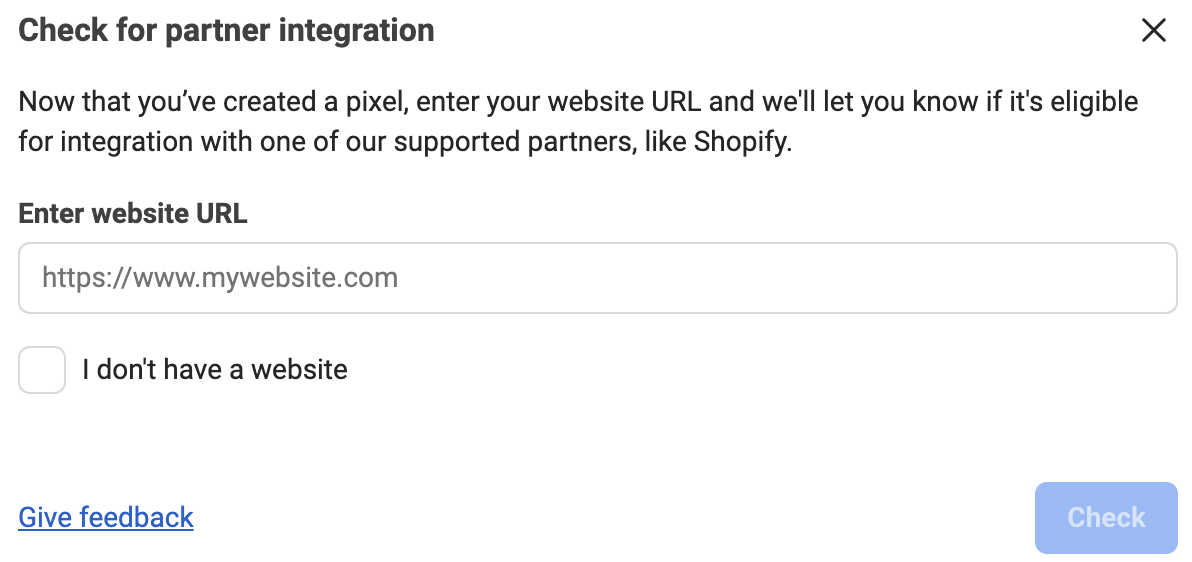
From your Ads Manager, go to Events Manager.
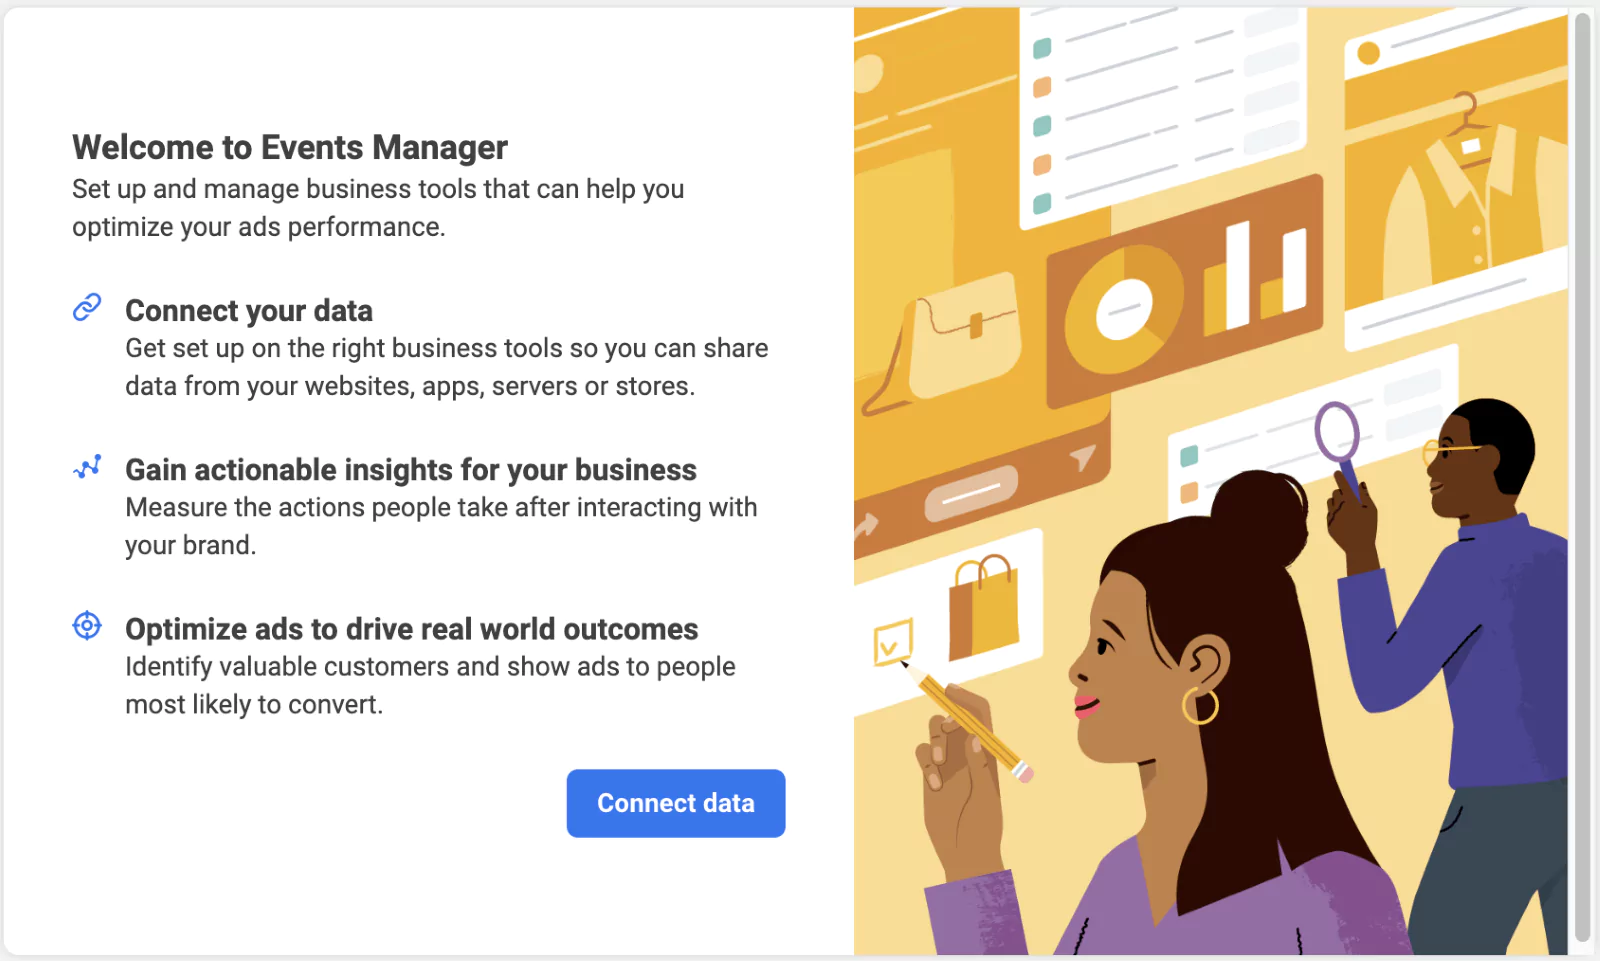
Click on Connect data and choose Web.
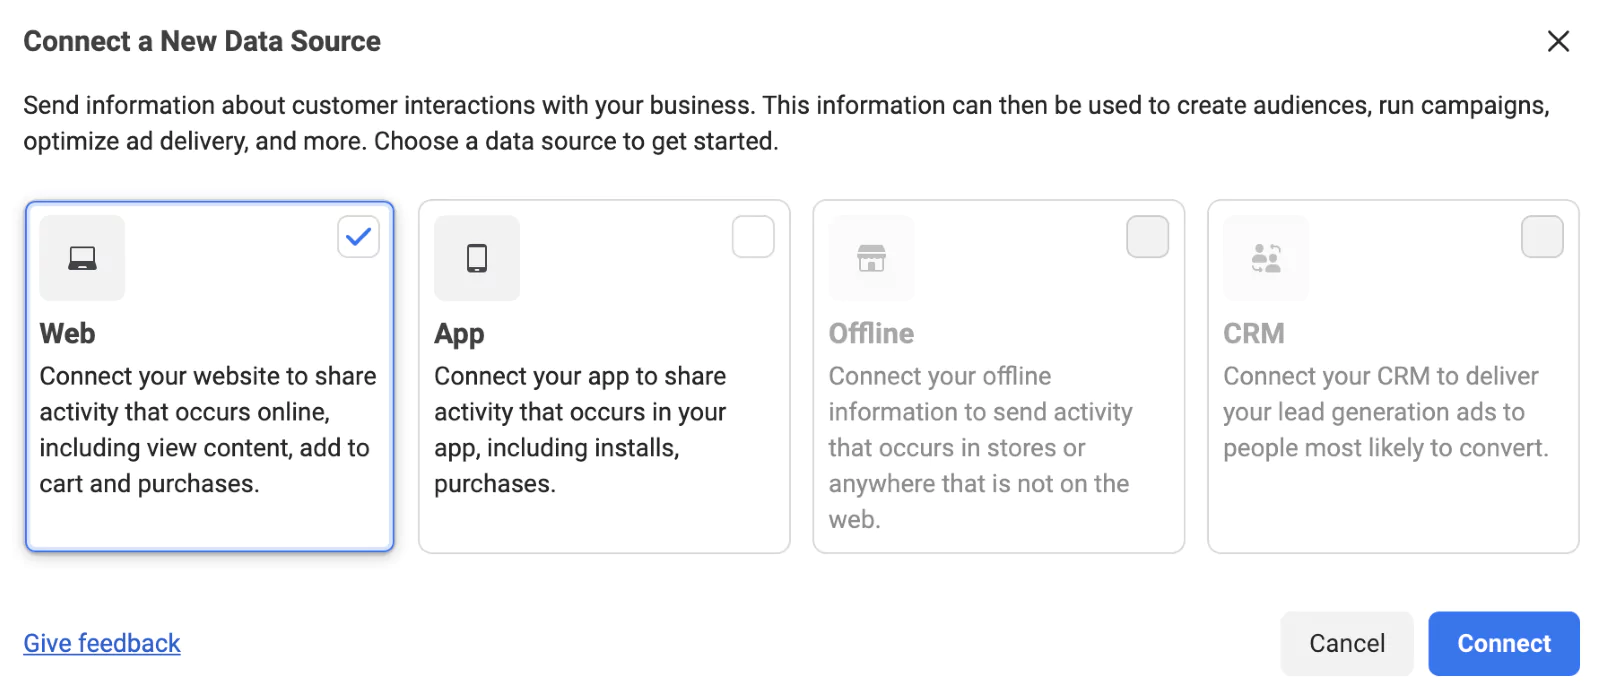
Then, give a name to your Pixel.

You’re now required to check for partner integration. Enter your website and click Check.
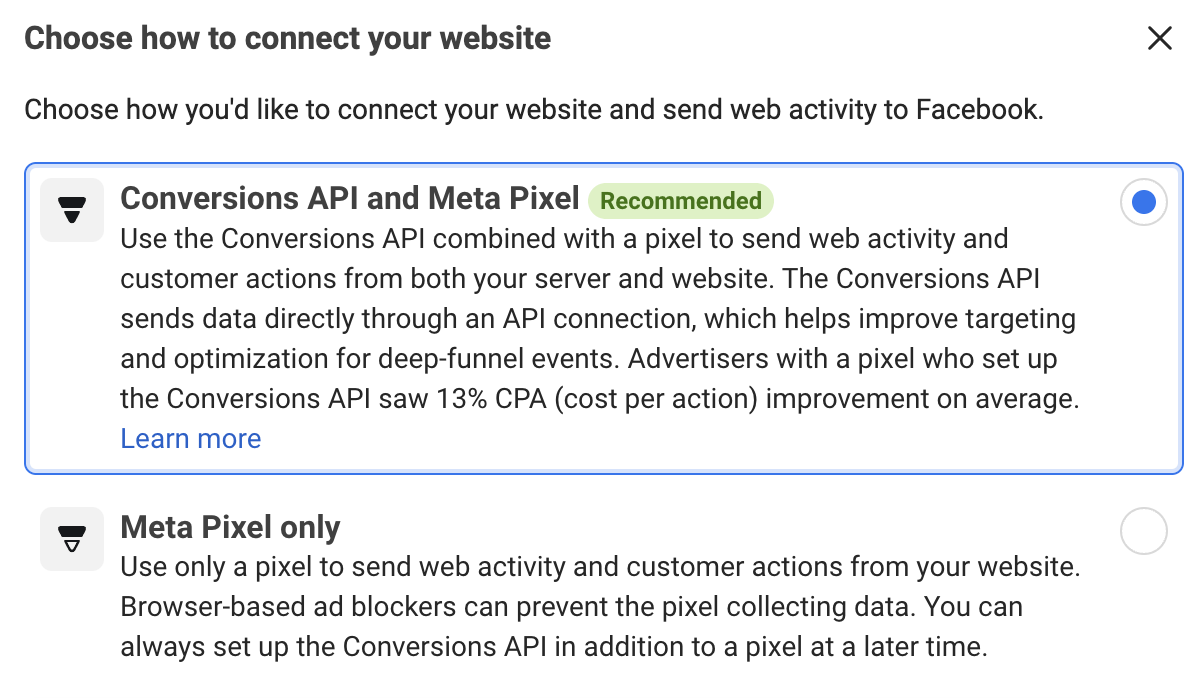
Choose how to connect your website to Facebook.
Meta recommends the Conversions API and Meta pixel option.
Next, choose how you’d like to set up your Conversions API.
It’s easier if you choose to set it through partner integrations.
Most of their partners have a straightforward way that don’t require any manual work.
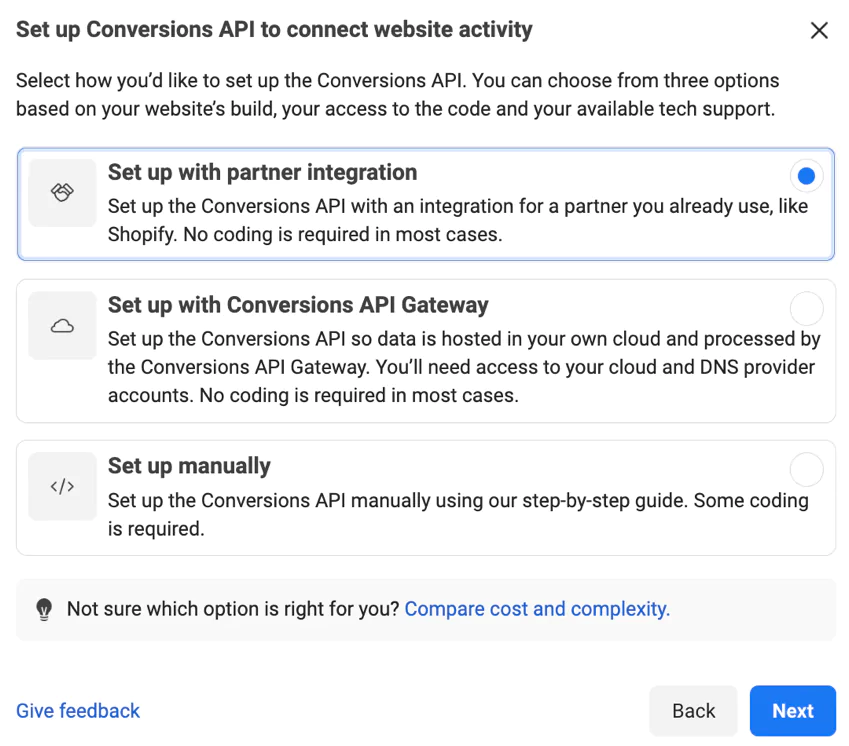
Finally, go on and choose your partner platform and follow their tutorial for installation.
If you’re on Shopify, all you have to do is install their Facebook & Instagram app.
That’s it.
Let’s have some fun.
3. Create cool ad visuals
Now that we’re done with administrative stuff, it’s time for the fun part – ad creatives.
Facebook offers a lot of options in terms of asset formats – images, videos, carousels.
It’s understandable why people are usually intimidated by this step. We’re not all designers.
And even simple design tools like Canva can feel overwhelming.
Especially if you want to create something a bit more engaging, like a video.
And have it product–focused to convert better.
eyeris.io is a tool that comes in handy as it creates impactful product video ads in seconds.
With virtually no creative input from your side.
It takes your product visuals and info straight from your Shopify feed, and boom.
You get tons of brand-representative product creatives ready to include in your ad sets.
What’s great is that eyeris.io’s friendly interface allows for easy customization.
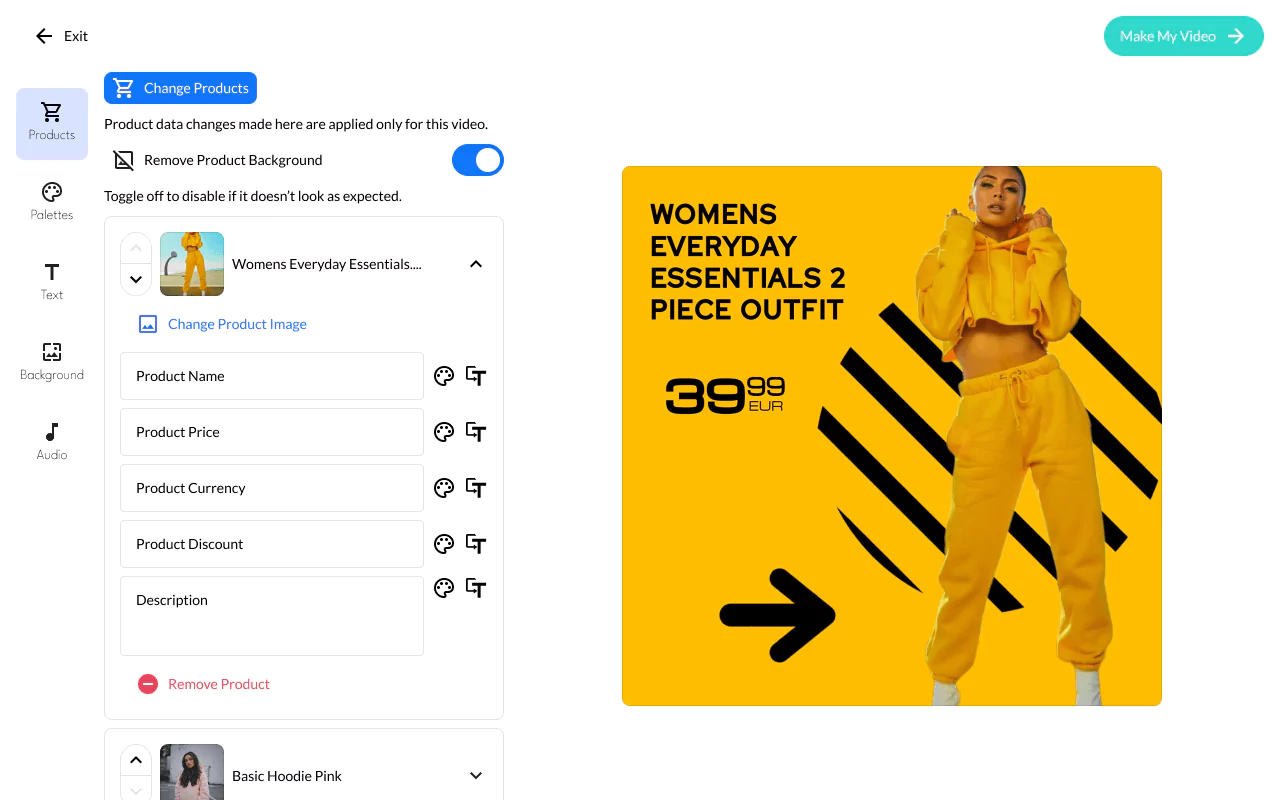
So you can quickly generate a few ad variants to A/B test in your campaigns and see which one performs better.
This is crucial for configuring your ads. You need to understand what gets your audience going, then cash on it.
Maybe a bolder color?
Or maybe you shouldn’t show the price?
eyeris.io is free to try now.
Give it a shot, and you’ll see how easy, yet powerful it is.
And while we’re on the subject of creatives, we must talk about AIDA framework.
AIDA means that your ads must drive:
- Attention
Use bold colors, different than Facebook’s blue & white.
Make them a scroll stopper.
- Interest
Write powerful ecommerce copy in your descriptions.
Focus on benefits, not features. Add a client testimonial for social proof. Use emojis. 😉
- Desire
Make an irresistible offer. A great product. A huge discount. Both?
- Action
Add a clear, compelling CTA (Call To Action).
“Shop now” is always better than “Learn more”.
By the way, you’ll be able to configure these CTAs in the Ads Manager.
Pro tip: Use Facebook Ad Library for inspiration.
In an effort to become more transparent, Facebook now allows you to search all ads businesses are running.
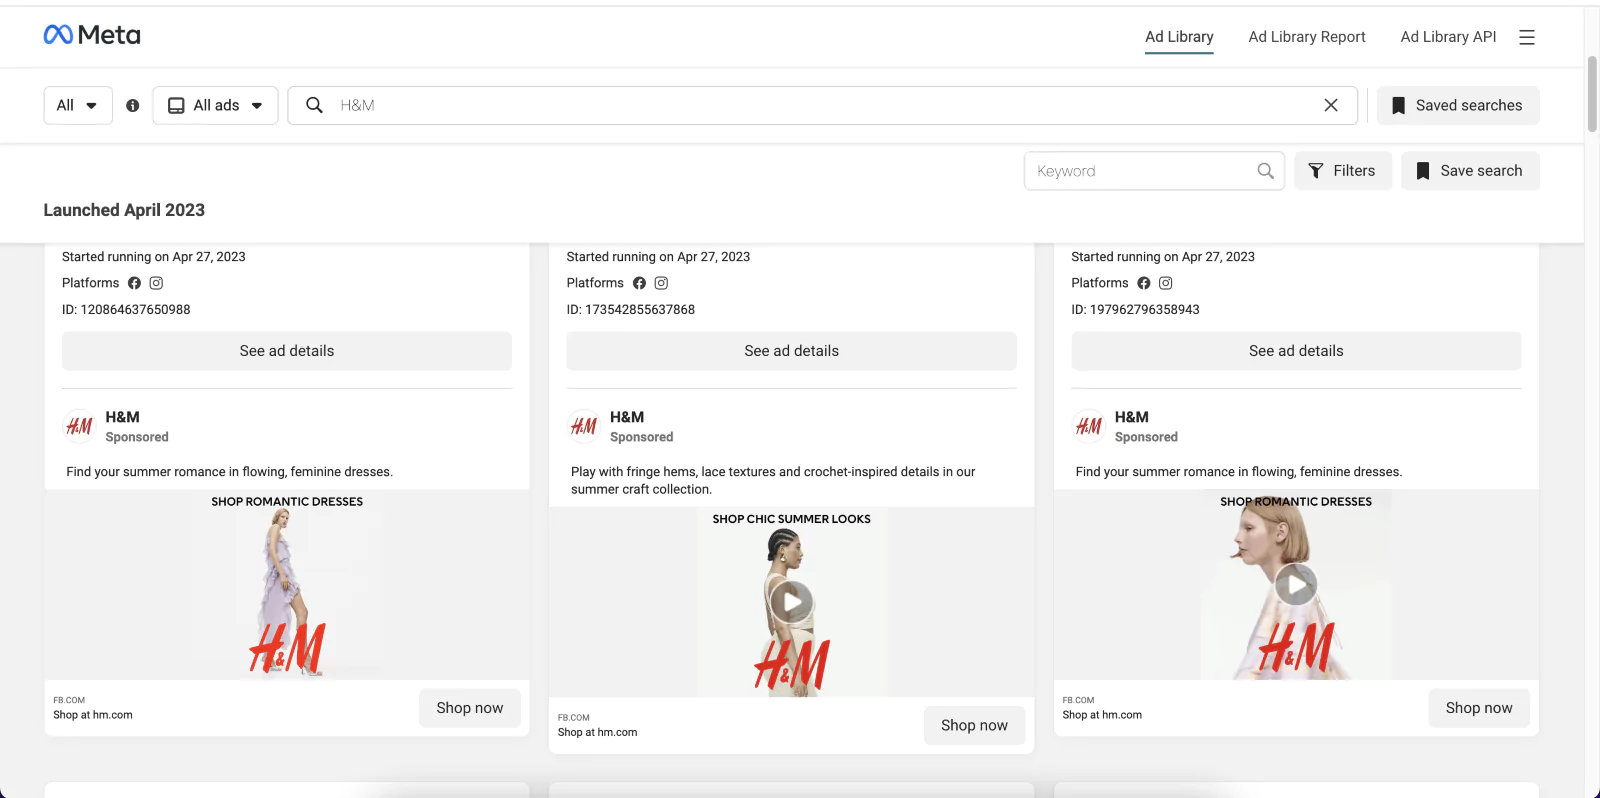
So, if you find yourself in a designer’s or writer’s block, this is a great place to start.
You can research your competition or any brand you admire.
See what they do in terms of visuals, but also text.
If they’re bigger than you and do it this way, it’s probably because it works.
4. Build your audience(s)
As I said before, ecommerce Facebook ads are all about the right visuals delivered to the right audiences.
Now that we’ve tackled visuals, it’s time we address the second part of the equation.
Go to Facebook Ads Manager -> Audiences -> Create Audience.
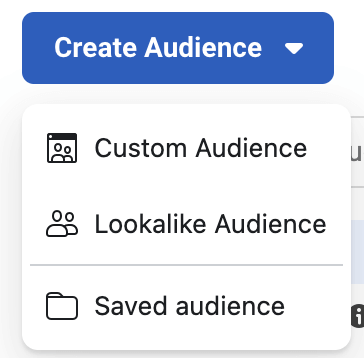
Facebook allows for three kinds of audiences.
Here goes:
Saved (or Core) Audiences
Saved audiences are audiences you use for Brand Awareness (or prospecting) Campaigns.
They’re the people who’ve never interacted with your brand before.
And you want to change that.
You want them checking out your website and entering your sales funnel.
These are audiences you configure manually, based on your buyer persona (i.e., your ideal target customer).
You must fully understand who your target audience is before you dive into this.
You’ll be able to configure them based on:
Locations. What area are you targeting? Is it a local business or are you selling country-wide? Be specific.
Age. Is it a brand for Gen Z, Millenials, or older people?
Gender. Are you targeting a specific gender, or both?
Interests or Behaviors. This I want to emphasize on because it’s perhaps the most important.
Facebook allows you to target people based on what subjects they’re interested in, what they like to do in their free time, how they spend their time online.
This is where it shows if you truly know your audience.
And if you get it right, it can yield great results.
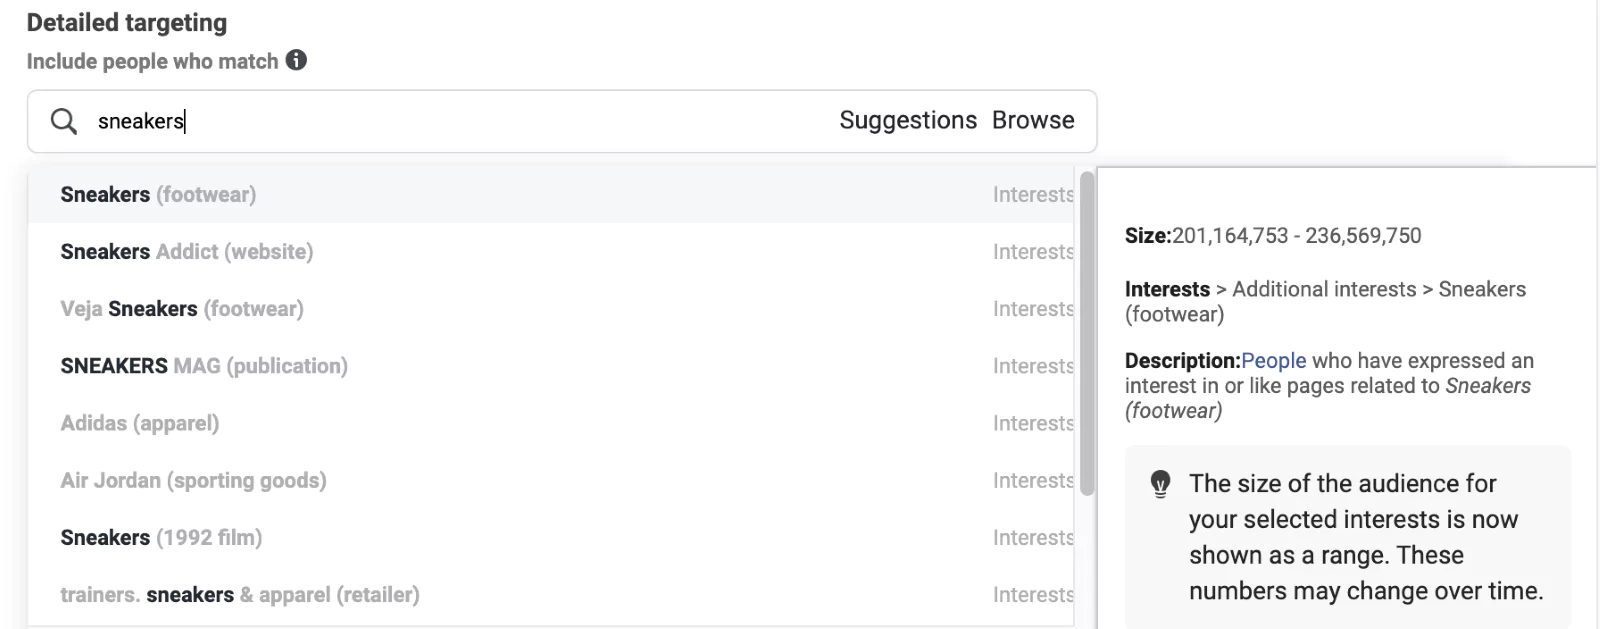
If you sell sneakers among other things, for instance, you can have a Saved audience specifically for sneakers.
However, you’ll see that these broad key terms come with wide ranges as well.
200 million people is too much to target.
I know I said that Facebook has 3 billion users, but your goal isn’t to reach all of them.
Your goal is to reach those that could actually turn into real customers.
So, make sure to keep Saved audiences as segmented as possible.
Not more than a few thousand people.
Custom Audiences
Custom audiences are audiences you use for your Retargeting Campaigns.
They’re the people that interacted with your brand in some way in the past.
Perhaps they’ve clicked a brand awareness ad, visited your website, checked out your Facebook Page, or even purchased from you.
These are the people you’ll want to nudge to take a certain action – to come back to an abandoned cart, or to purchase again.
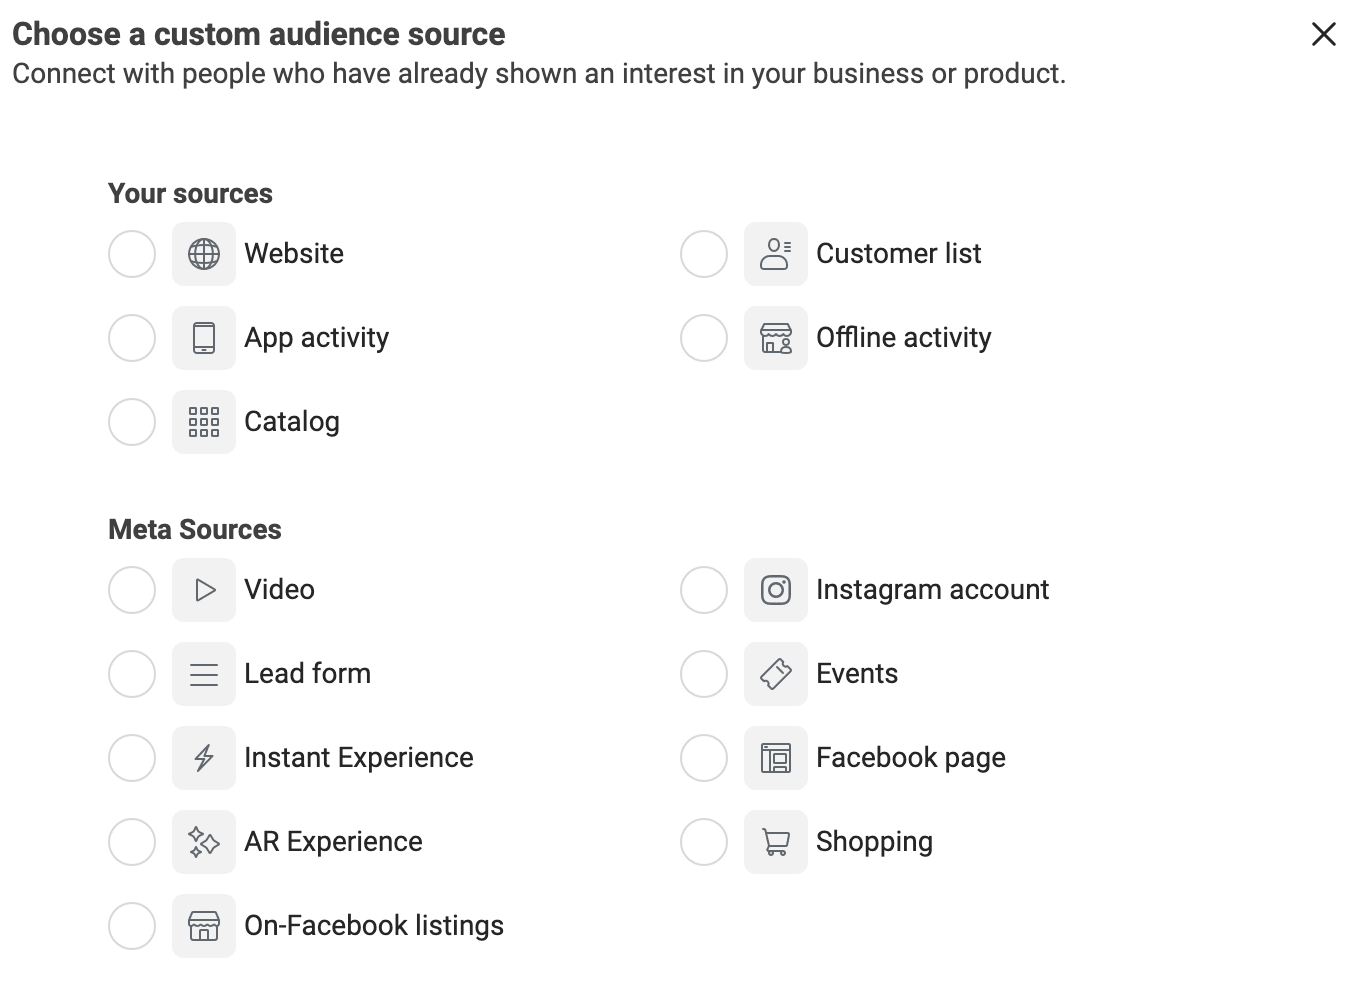
When you click Create a Custom Audience, you’ll get two types of sources to choose from:
Your sources, which have options such as:
Website. You’ll use this to target people who have interacted with your website.
By the way, this is where the Meta Pixel comes in handy. He’s the one gathering all the data.
You can configure audiences that visited your landing page, audiences that visited a certain product page, or audiences that added items to cart but never got to the thank you page.
Customer list. Which lets you upload a spreadsheet of your customers.
Based on their emails and other details, Facebook will be able to match users.
And then you can retarget them with upselling ads, convincing them to purchase again.
These audiences are powerful because these are people that already know and trust you. They’ve bought from you before, so it doesn’t take much to persuade them to do it again.
Or Meta Sources, which let you build audiences based on their interaction with your Facebook account.
Maybe they’ve watched one of your videos, completed a lead form, or visited your Instagram profile.
These people are great sources for building Lookalike audiences, which we’ll cover next.
Lookalike Audiences
Lookalike audiences are based on your Custom audiences.
Facebook takes your Custom audience and then finds other people that match the same criteria, but haven’t interacted with your brand before.
These people are the same as your existing customers or prospects.
But they’re a fresh new opportunity for you to target with Brand Awareness Campaigns to keep feeding your sales funnel.
These are by far the best performing audiences.
Use your best ads for Lookalike audiences.
5. Start with a Brand Awareness Campaign
Ok, so we have:
√ Visuals – checked.
√ Audiences – checked.
Now let’s put them to use.
If you’re just beginning, and you don’t have lots of traffic to your website yet, it’s best to start with Brand Awareness Campaigns.
Brand Awareness Campaigns must be a constant in your ecommerce Facebook ads strategy.
These are the worst performing campaigns in terms of conversions, but should always account for 80% of your ad budget.
What?
Hear me out.
Brand Awareness Campaigns are not meant to convert (i.e., convince to purchase). That’s what Retargeting Campaigns are for.
Instead, they’re meant to keep your top of funnel fed.
Otherwise, you’ll never have new people visiting your website, and you’ll keep retargeting the same people again and again, with no result.
And you’ll get frustrated. We don’t want that.
Besides, Brand Awareness ads are also the least expensive.
So let’s create one.
From your Ads Manager, click Create.
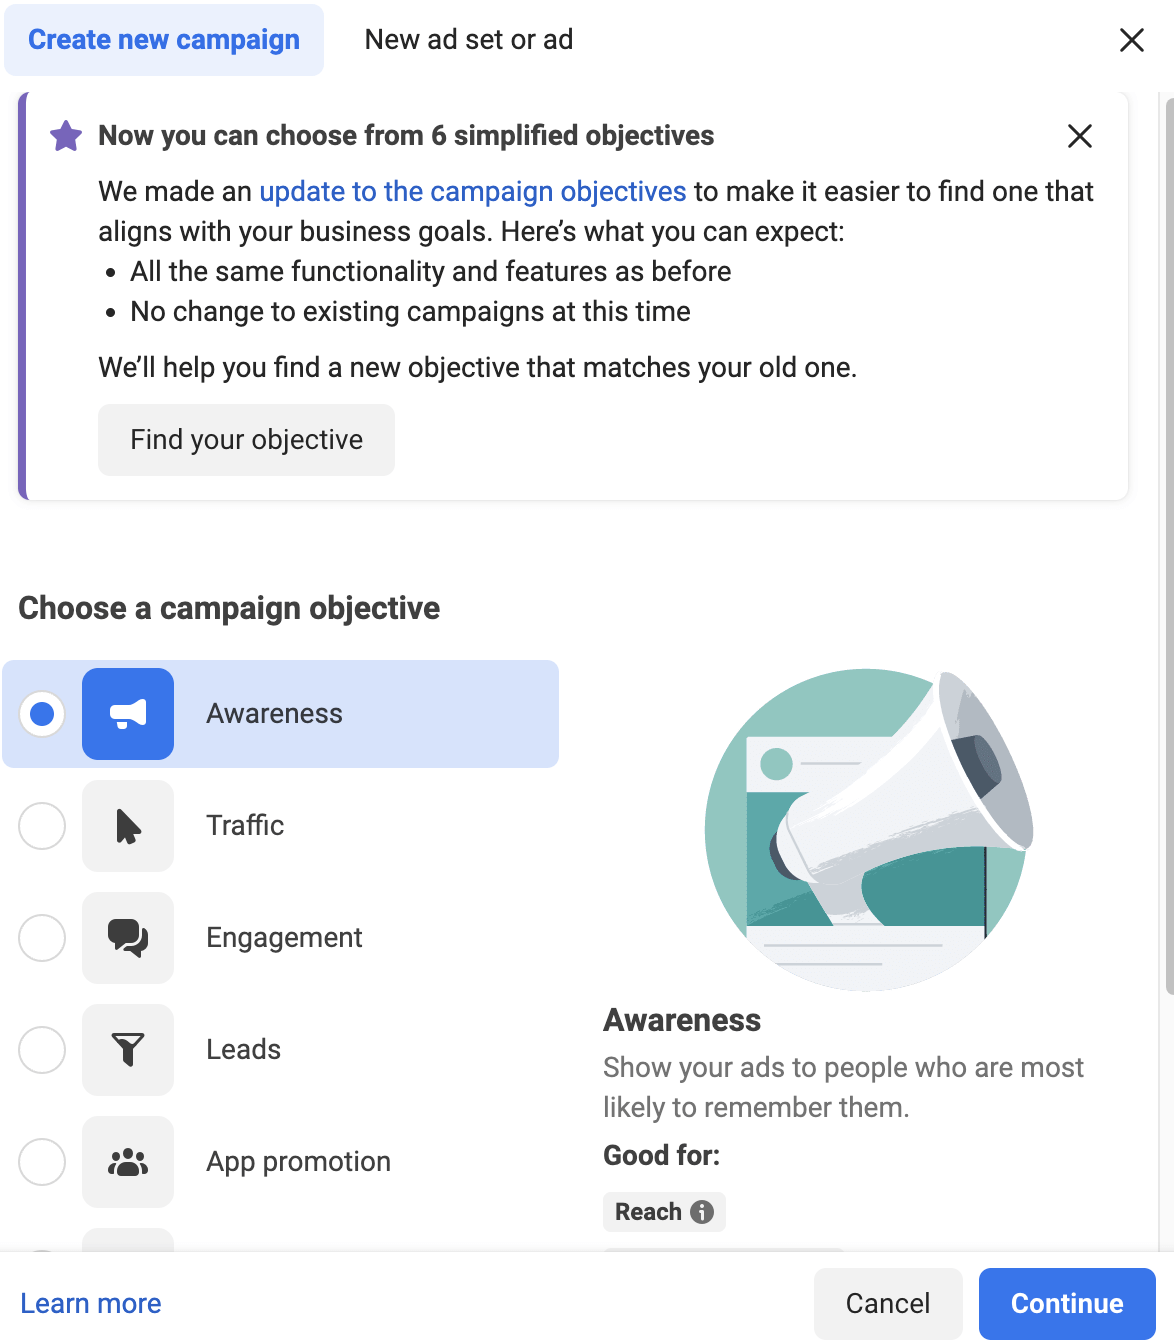
Select the Awareness objective, and then go on to configuring your ad.
Each ad you create will have three layers (or levels).
- The campaign level. This is where you set your goal & budget.
In terms of budgets, a best practice is:
- If your audience is below 5000, set it to 5-10$/day
- If your audience is between 5000 – 50’000, set it to 20-40$/day
- The ad set level. This is where you set your audience.
- The ad level. This is where you upload the cool ad visuals you created. You should A/B test here.
Pro tip: Use your best-selling products for Brand Awareness Campaigns. If your customers loved them, chances are the new target audience will, too.
6. Retarget website visitors
It’s time we moved on to retargeting objectives.
First, website visitors.
The goal here is to nudge people who just browsed your site but didn’t take any concrete action, to reconsider.
Let’s create a Custom audience to target website visitors.
Click Create Audience -> Custom Audience, then choose Website as your source.
Then, you can choose to target all website visitors, or people who visited a certain page, such as a product page, for instance.
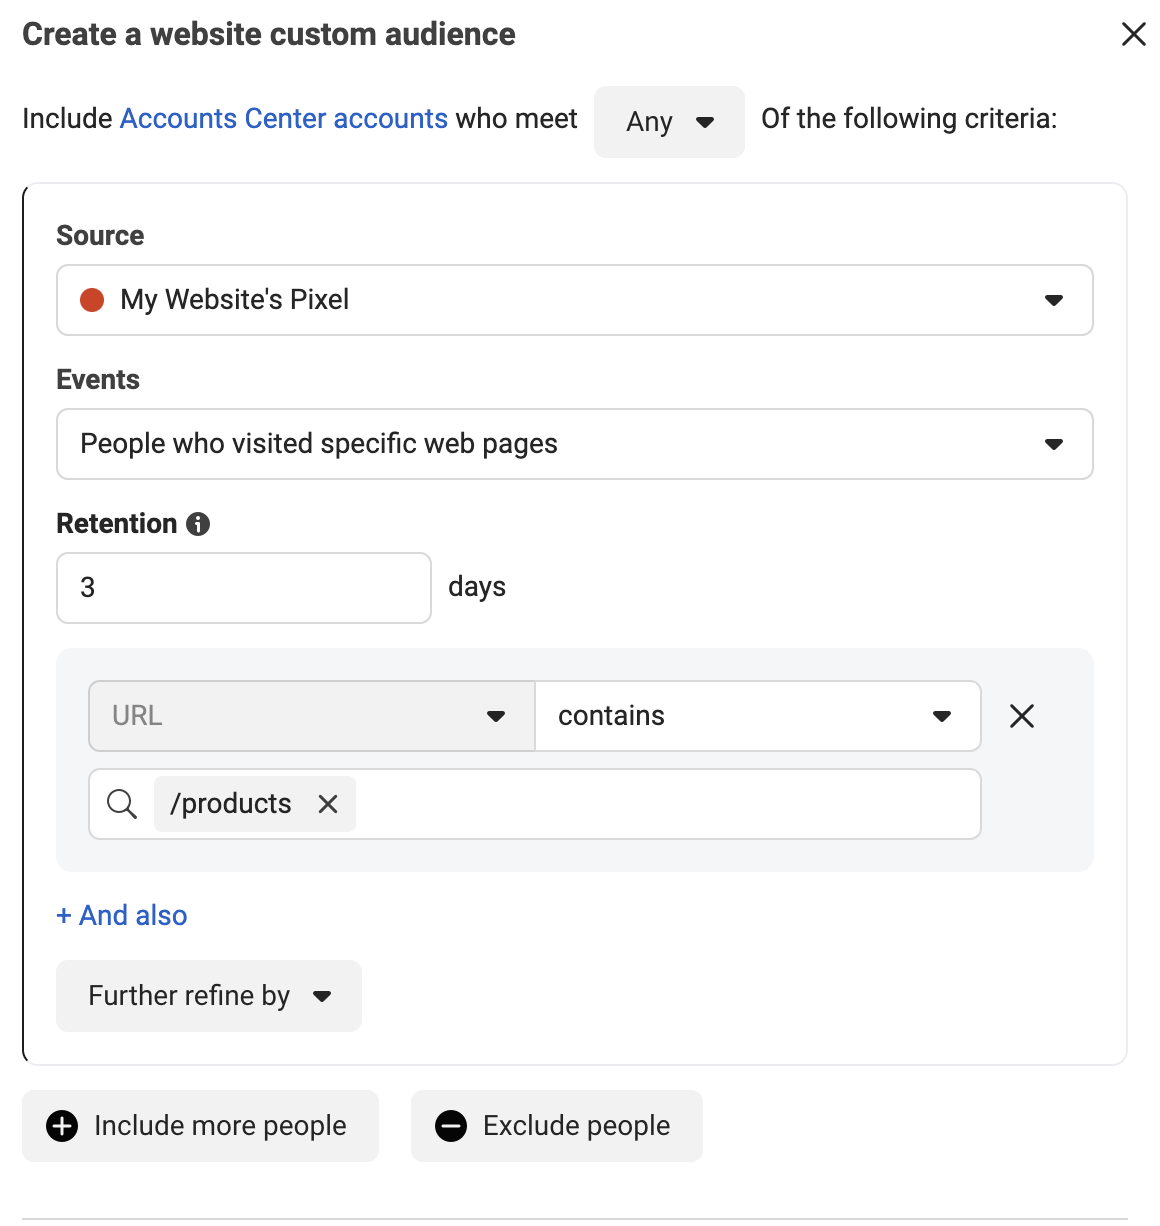
Retention means “the number of days you want for accounts to remain in your audience after meeting the website traffic criteria you specified”.
Facebook’s default is set to 30 days, but I’d advise to keep it lower.
You generally don’t want to keep retargeting users who visited your page a month ago.
Hit them when the intent is fresh. Like 3 days, or a week after.
After that, it’s better to focus your attention (and budget) on other prospects with a higher chance to convert.
7. Retarget cart abandonment
According to Baymard Institute, 70% of online shopping carts are abandoned.
That’s a huge revenue opportunity lost.
If you could recover at least some of it, it’d still be a great plus.
Cart abandonment campaigns are great because they’re a reminder of the cool benefits users are missing out on for not completing the purchase.
If you’ve ever browsed a website but changed your mind at the check-out, then began seeing that brand all across social media, you were the target of such a campaign.
In order to do it too, you simply need to create a Custom audience by targeting the people who reached the cart page.
But make sure to exclude those that actually completed the purchase. You don’t want to waste any of that precious ad budget.
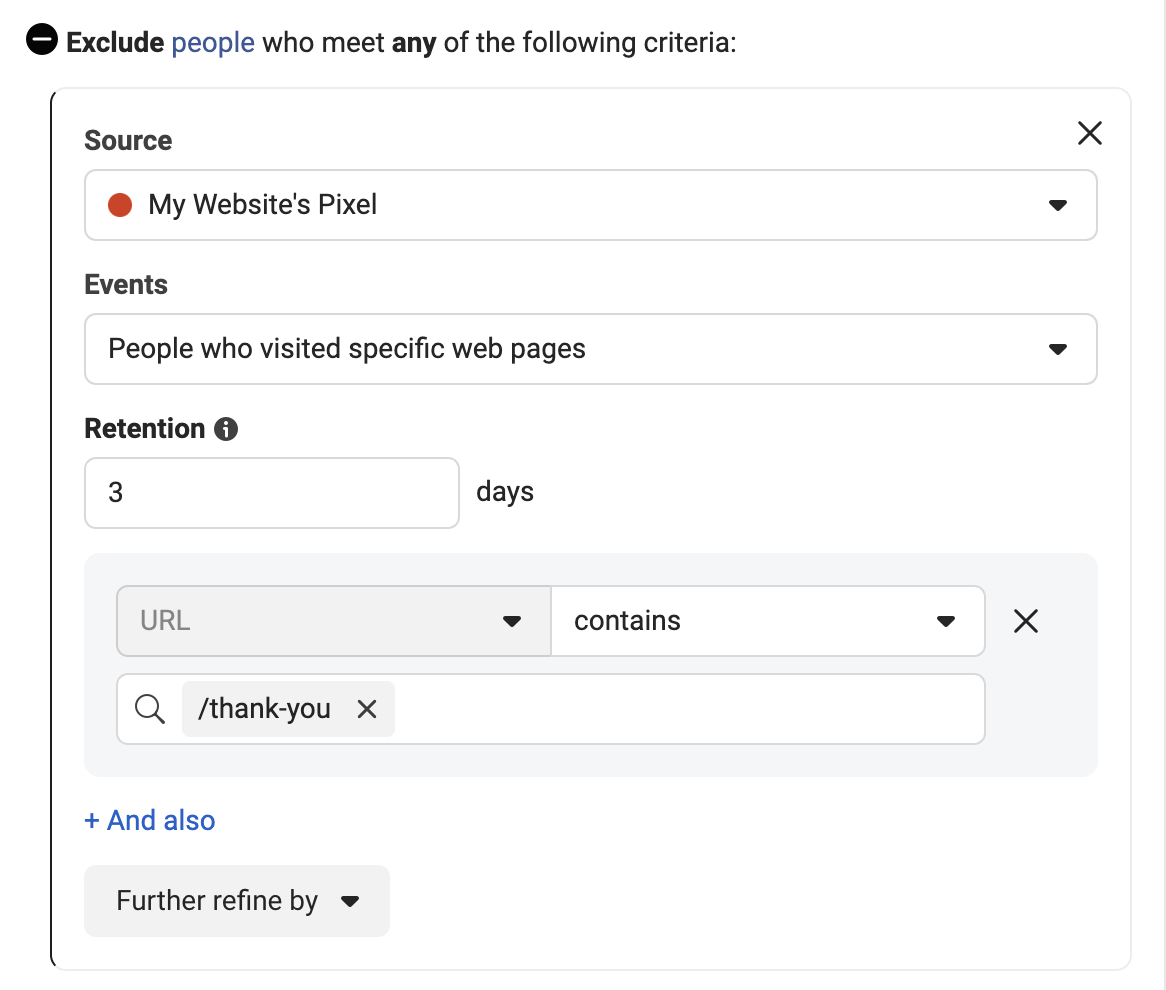
You should always ensure that your audiences don’t intersect, so you maximize returns.
That’s it.
Now that you have both your Brand Awareness and Retargeting Campaigns set up, your flow should look something like this:
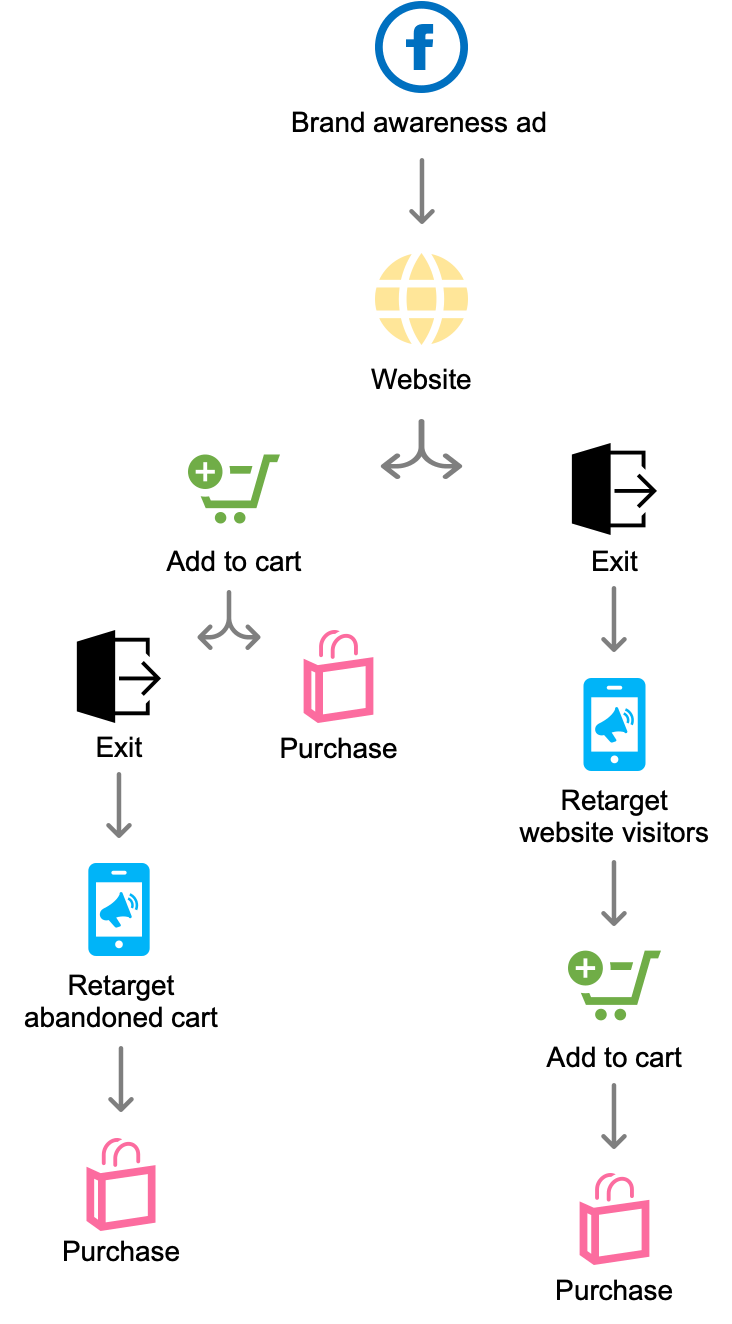
As you see, the goal is to always have that Purchase made.
With this flow in place, you ensure that:
- Your top of funnel is always fed with new prospects through Awareness Campaigns
- Prospects are constantly being nudged in the right direction by Retargeting
- You increase conversion rates, and thus revenues
8. Upsell to your existing customers
The only thing we haven’t really covered is your existing customers.
As I’ve mentioned before, they are great ad targets because they already trust your brand.
Create a Custom audience based on the Customer list and let Facebook do the rest.
A great idea is to run this type of campaigns when you have new product releases.
Because you already know that these people are interested in your product and brand.
So, if they had a positive experience in the past, a new arrival might entice them to purchase again.
9. Go further with dynamic ads
If you want to take your ad game up a notch, you should also consider dynamic ads.
Especially if you sell a large number of products.
How it works is that Facebook takes your product feed, then uses machine learning to show unique products to each user based on their specific interests, behaviors, and demographics.
Instead of running multiple ads for different products, you could use dynamic ads to accomplish the same purpose.
They work great both for awareness and retargeting objectives.
For this ad type, you must have your Facebook Product Catalog connected, then choose the Product Catalog Sales as the campaign objective.
10. Monitor KPIs
Lastly, let’s have a look at some KPIs to always monitor for your ecommerce Facebook ads.
Just so you ensure you’re constantly optimizing things.
- ROAS (Return on Ad Spend) - A metric that measures the revenue generated from an ad campaign compared to the cost of running it. Watch out for high costs and low revenue, which will result in a low ROAS.
- Adjusted ROAS - A more precise version of ROAS that factors in additional costs like shipping and taxes. It's important to monitor Adjusted ROAS to ensure profitability and avoid overspending on advertising.
- Frequency - The average number of times an ad is shown to a user. Keep an eye on frequency to avoid ad fatigue and ensure your audience isn't seeing the same ad too many times.
- CPM (Cost per Thousand Impressions) - The cost of displaying an ad to 1’000 people. Monitor CPM to make sure you're getting a good value for your advertising dollars.
- Click Through Rate (CTR) - The percentage of people who click on your ad after seeing it. A high CTR indicates that your ad is relevant and engaging to your target audience.
- Cost per Purchase (CPP) - The average cost of acquiring a customer through an ad campaign. Watch out for high CPPs, which can eat into profits and indicate that the campaign isn't performing well.
- Cost per Add to Cart (CPATC) - The average cost of getting someone to add a product to their cart through an ad campaign. Monitor CPATC to ensure your campaign is targeting the right audience and driving conversions.
- Cost per Click (CPC) - The average cost of a user clicking on your ad. Keep an eye on CPC to make sure your campaign is cost-effective and efficient.
Conclusion
It’s become crucial to be present in front of your customers across many touchpoints in order for them to convert.
You should always start with the most affordable ecommerce marketing strategies first.
Do ecommerce email marketing, maintain a consistent social media presence, tackle SEO.
Just make sure to complement all these efforts with some paid traffic as well, so in the end, it’s all worth it.
Beginning your advertising journey on Facebook can feel overwhelming.
Start small, test the waters, and increase your budgets as your revenue grows.
And by having a step-by-step approach, being persistent and constantly optimizing, you’re bound to get the desired results.


